EDITING IMAGES
ADOBE CAMERA RAW
There is an unending selection of image editing software on the market, and I don’t profess to being an expert as to which tool to use, however my preferred image editing tool is Adobe Photoshop, which according to the reviews is one of the best options. Not that I selected it based on reviews, it was simply the first software I was schooled in using. The section I go to first is Bridge/Camera Raw. The biggest advantage of Camera Raw is that it’s specially designed for photo editing. Another advantage is the original raw data is preserved in the DNG file so that any adjustments made to an image in Camera Raw are not permanent, so you can experiment to your heart’s content.Adobe has also recently updated Photoshop so you can access Camera Raw within Photoshop. Located at Filter/Camera Raw Filter.
Image editing is an entire textbook in itself, so rather than try and walk you through step by step how to use Camera Raw & Photoshop to edit your images, I have selected only the common editing techniques that I find helpful.
SHARPENING AN IMAGE
Digital cameras often produce images that look at bit soft and can often contain tiny specs of noise that can be distracting. The DETAILS TAB is where you can deal with these problems, and hopefully produce a sharp, noise-free image. When using the Details tab, make sure you also use the zoom tool to image in 100% magnification as otherwise it can be difficult to see the changes you’re making. The specific adjustments to make are:.- Sharpening: increase amount value to increase sharpening. In general, set amount to lower value for a cleaner image.
- Radius: set to fine, as a large radius generally results in unnatural looking images
- Detail: lower settings primarily sharpening edges to remove blurring. Higher values are useful for making the textures in the image more pronounced.
- Luminance: setting is also designed to reduce noise that shows up when using high ISO setting on your camera. You have to be careful with the luminance smoothing, however, as it will soften your image. Sometimes it is better to have a noisy image that still has detail than one with no noise that looks overly soft.
REMOVE ERRORS IN AN IMAGE
Dust spots
If you have dust spots on your image, fixing the image is simple using the SPOT HEALING BRUSH TOOL.Select the tool, then use OPTION key to select what you want to copy and start healing.
Completely removing an object from an image is a little more complicated and can only be done in photoshop. Once you have opened your image in photoshop the steps to follow are:
- Select either the Quick Selection tool or Object Selection tool. Both work well.
- Use the tool to outline the object you want to remove. For the Quick Selection tool paint from within object. For the Object Selection tool, make sure it is on Lasso mode and circle roughly around the object to select it.
- Right click or use the control key to access the dropdown menu, and select fill/content-aware. Also make sure that you have selected 100% opacity.
FIXING TONE AND CONTRAST PROBLEMS
There are many options, and I have highlighted the most important:
- Vibrance is ideal for adjusting colour saturation in portrait images as it has a built in skin tone protector allowing you to make more colourful images without clipping those colours which are saturated enough.
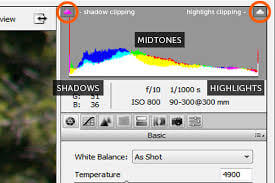
- Exposure is also a highly critical adjustment, as half of the captured data sits in the brightest f-stop and adjustments set the white endpoints. Use the histogram to guide you when adjusting the image to make sure you’re not clipping any of the shadows to pure black, or highlights to pure white. Since the histogram represents the overall tone range from pure black on the left to pure white on the right, if you see peaks at either end appear as you adjust then you’ve clipped the image.
- Curves is also a useful tool for correcting tone and contrast problems. Instead of making adjustments using only three variables (highlights, shadows, midtones) brighten images with curves. Curves allows you to make more fine tune adjustments to brightness and contrast. You can adjust any point along the tonal scale while keeping other values constant.
Another tip is to hold down the ‘option’ key on a mac computer to see the clipping display, that way you only clip the specular highlights.
To learn more about photoshop editing tools check out ww.photoshop.com/tutorials